Leveraging Particle Network on ZetaChain
Comprehensive tutorial diving into the process of using Particle Network's Auth Core and AA SDK on ZetaChain.
Leveraging Particle Network on ZetaChain
Particle Network natively supports ZetaChain both through its Modular Smart Wallet-as-a-Service (social logins and embedded wallets) stack and its full-stack account abstraction infrastructure –including the Particle Bundler, Omnichain Paymaster, and a deployment of SimpleAccount. Thus, developers building Omnichain dApps on ZetaChain can leverage end-to-end account abstraction either directly or hand-in-hand with consumer-ready onboarding and interaction through Smart Wallet-as-a-Service. The intersection of these technologies (Omnichain dApps and Smart Wallet-as-a-Service) results in a next-generation user experience.
This document will outline how you can begin building with Particle Network's Smart Wallet-as-a-Service on ZetaChain, or alternatively, use Particle's AA infrastructure directly (independent from Smart Wallet-as-a-Service).

Part 1: Smart Wallet-as-a-Service
Getting Started
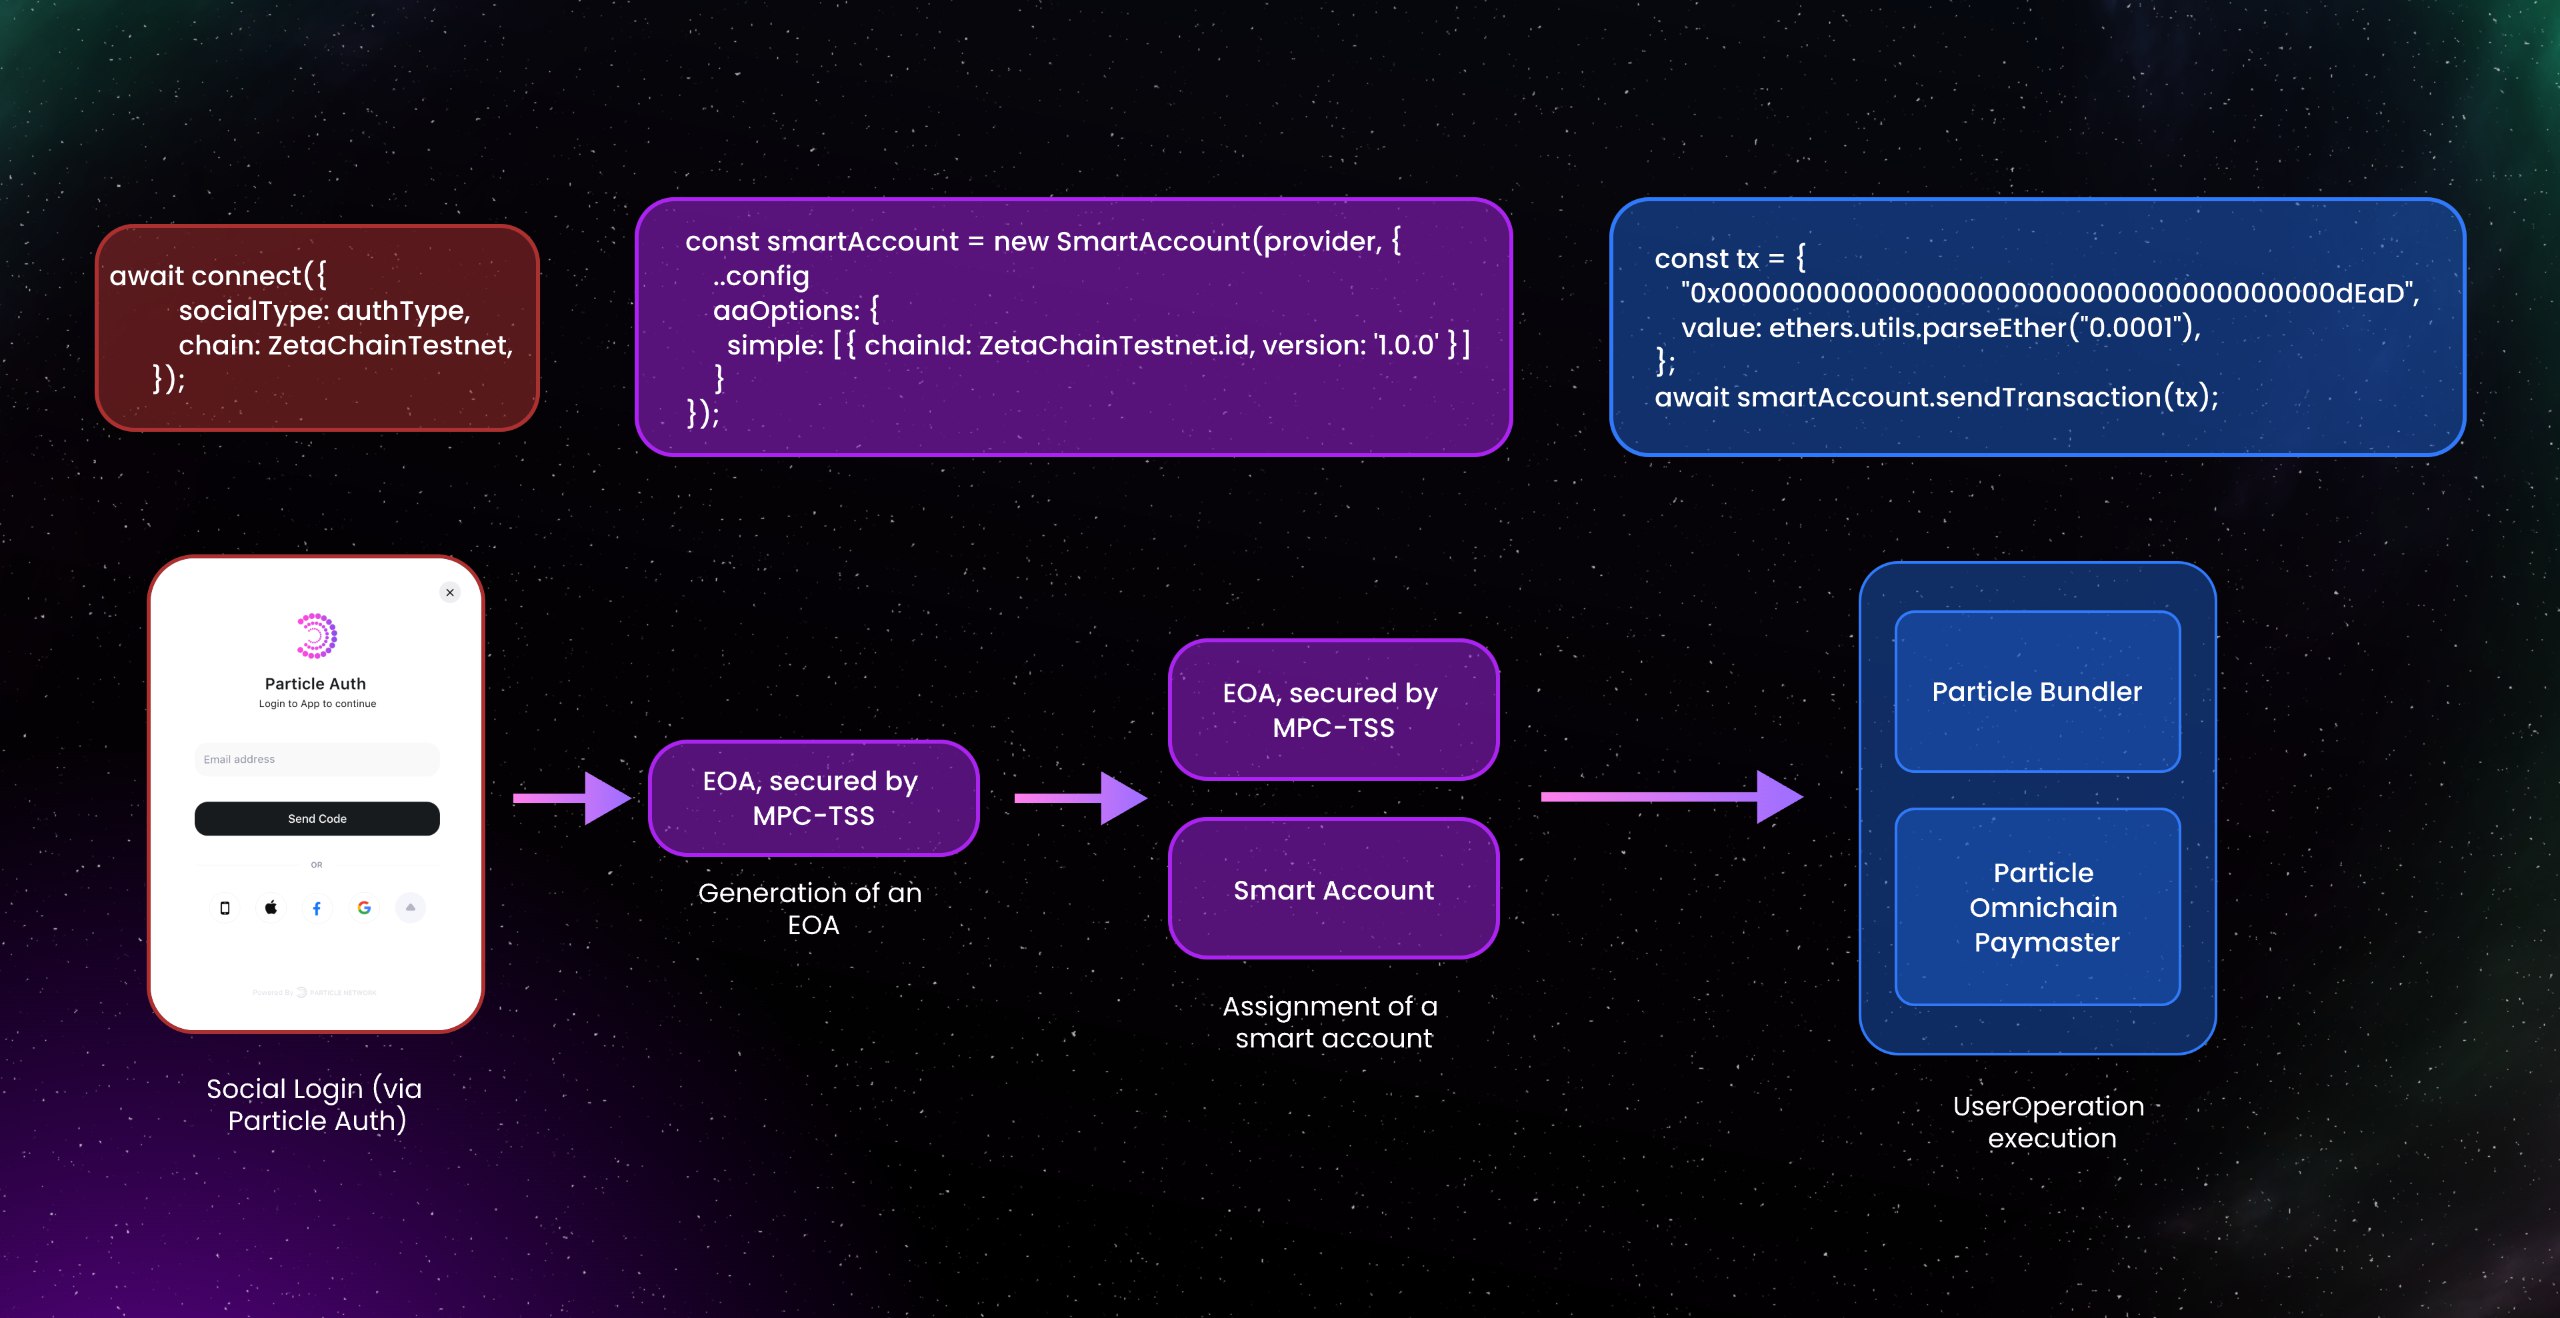
Within this tutorial, we'll be using Particle Auth Core (@particle-network/auth-core-modal), which is Particle Network's flagship SDK facilitating implementation of its Smart Wallet-as-a-Service. Additionally, we'll also be leveraging Particle's AA SDK (@particle-network/aa). These two SDKs will be used in tandem to facilitate social logins and, in this example, the execution of a sample gasless transaction (a burn of 0.001 ZETA), sent through the Particle Bundler and Omnichain Paymaster.
To learn more about Particle Auth Core, take a look at this sample. To learn more about the Particle Network AA SDK, check out the AA quickstart page.
To begin, you'll need to install a few different libraries, as mentioned above. Specifically, you'll need to install the following libraries:
@particle-network/auth-core-modal, for social logins and the associated embedded wallet modal.@particle-network/aa, to handle account abstraction, such as defining a specific smart account, custom EIP-1193 provider, etc.@particle-network/chains, for theZetaChainTestnetchain object to be used in the configuration process.ethers, to facilitate Web3 interaction.reactandReactDOM, for this specific example (React demo application).
Copy one of the two following commands and execute it within the root of your project, this'll install all of the above libraries through either Yarn or npm.
yarn add @particle-network/auth-core-modal @particle-network/aa @particle-network/chains ethers
Or,
npm install @particle-network/auth-core-modal @particle-network/aa @particle-network/chains ethers
Configuring Particle Auth Core
With these installed, you'll need to import a few specific objects from these libraries. Let's begin with index.tsx –this is where we'll be configuring Particle Auth Core. At the top of index.tsx, import the following objects:
import React from 'react'
import ReactDOM from 'react-dom/client'
import { ZetaChainTestnet } from '@particle-network/chains';
import { AuthCoreContextProvider } from '@particle-network/auth-core-modal';
import App from './App'
As mentioned, index.tsx should be used for configuring Particle Auth Core and initializing the @particle-network/auth-core-modal SDK. Thus, to do this, you'll be defining various parameters within AuthCoreContextProvider, as shown below:
ReactDOM.createRoot(document.getElementById('root') as HTMLElement).render(
  <React.StrictMode>
    <AuthCoreContextProvider
      options={{
        projectId: process.env.REACT_APP_PROJECT_ID,
        clientKey: process.env.REACT_APP_CLIENT_KEY,
        appId: process.env.REACT_APP_APP_ID,
        erc4337: {
          name: 'SIMPLE',
          version: '1.0.0',
        },
        wallet: {
          visible: true,
          customStyle: {
              supportChains: [ZetaChainTestnet],
          }
        }
      }}
    >
    <App />
      </AuthCoreContextProvider>
  </React.StrictMode>
)
Let's break this snippet down by each parameter defined within AuthCoreContextProvider, beginning with projectId, clientKey, and appId. These values are required for the initialization of every major SDK offered by Particle Network, as they fundamentally link your application (instance of Particle Auth Core) with the Particle Network dashboard, thus allowing for user tracking, UI customization, etc.
To fetch these values, head over to https://dashboard.particle.network and either create or log into an account, then spin up a new project. Within this new project, you'll need to create an application –in this example, we're building a web app, so you can select "Web." Next, you'll be prompted for an application name and URL; if you don't have a deployed application yet in which to use the SDK, feel free to fill in the URL parameter with any filler domain, as it won't affect usage. With this set up, you can copy the Project ID, Client Key, and App ID, and paste these into the corresponding environment variables within your project.
Beyond the projectId, clientKey, and appId parameters, you'll also need to set erc4337, which dictates the account abstraction state (or lack thereof) of the embedded wallet modal. In this case, we're using a SimpleAccount implementation (our only currently supported smart account implementation on ZetaChain), which we can dictate by setting name to "SIMPLE". Additionally, version should be set to "1.0.0".
Finally, you can also set custom wallet modal styling and settings through wallet, where we're setting visible to true, indicating that the wallet modal will be shown upon login (through a Particle logo popup on the bottom right corner of the application). customStyle can also be set for more targeted settings, restricting supportChains to ZetaChainTestnet and resulting in the wallet modal being exclusively bound to the ZetaChain testnet.
For more information on configuring Particle Auth Core, head over to the "Configuring Particle Auth Core" sample.
At this point, your index.tsx file should look something like the snippet below:
import React from 'react'
import ReactDOM from 'react-dom/client'
import { ZetaChainTestnet } from '@particle-network/chains';
import { AuthCoreContextProvider } from '@particle-network/auth-core-modal';
import App from './App'

// Optionally, feel free to add this block if you're having issues
import('buffer').then(({ Buffer }) => {
  window.Buffer = Buffer;
});
//

ReactDOM.createRoot(document.getElementById('root') as HTMLElement).render(
  <React.StrictMode>
    <AuthCoreContextProvider
      options={{
        projectId: process.env.REACT_APP_PROJECT_ID,
        clientKey: process.env.REACT_APP_CLIENT_KEY,
        appId: process.env.REACT_APP_APP_ID,
        erc4337: {
          name: 'SIMPLE',
          version: '1.0.0',
        },
        wallet: {
          visible: true,
          customStyle: {
              supportChains: [ZetaChainTestnet],
          }
        }
      }}
    >
    <App />
      </AuthCoreContextProvider>
  </React.StrictMode>
)
Building the Demo
Now that Particle Auth Core has been configured and initialized through AuthCoreContextProvider within index.tsx, we're ready to build our demo and dive into the specific utilization process of Particle's Smart Wallet-as-a-Service. To begin, head over to App.tsx (or its equivalent within your project); this is where the primary components of this application will be hosted.
Before jumping into App.tsx, let's establish some context as to what will be built within App.tsx. As mentioned, the goal here is to have a user log in with one of their social accounts (in this example, we can use Google or Twitter), and send a sponsored transaction (a burn of 0.001 ZETA). More advanced functionalities, such as the usage of session keys, are also possible, as outlined here. However, for this demo specifically, we'll stick to one of the most used functions of account abstraction –gasless transactions. You'll be able to apply the same flow covered here to your own application on ZetaChain.
To begin, similar to index.tsx, you'll need to import a few specific objects from the libraries installed a moment ago. Ensure the first few lines follows the structure of the snippet below:
import React, { useState, useEffect } from 'react'; // Optional, only used for the demo frontend
import { useEthereum, useConnect, useAuthCore } from '@particle-network/auth-core-modal';
import { ZetaChainTestnet } from '@particle-network/chains';
import { AAWrapProvider, SmartAccount, SendTransactionMode } from '@particle-network/aa';
import { ethers } from 'ethers';
To control Particle Auth Core, we're using a number of different hooks that'll individually (modularly) provide the functionality that we need within this demo. On the account abstraction side, we're importing a number of objects that'll exclusively be used in the construction of a custom EIP-1193 provider to be used with ethers.
Kicking it off, you'll need to define a few functions from the aforementioned hooks, specifically provider, connect, disconnect, and userInfo (of these, only provider and connect are required).
const { provider } = useEthereum();
const { connect, disconnect } = useConnect();
const { userInfo } = useAuthCore();
With the above set up, let's move onto configuring the custom EIP-1193 account abstraction provider mentioned previously. To do this, you'll need to configure an instance of SmartAccount, the master object for Particle Network's AA SDK. Configuring SmartAccount can be explained in two halves: The first half is standard Particle SDK configuration (defining projectId, clientKey, and appId), while the second will be choosing a smart account implementation to be used within the SDK (as covered earlier, this'll be SimpleAccount, or in SmartAccount, represented as simple).
const smartAccount = new SmartAccount(provider, {
    projectId: process.env.REACT_APP_PROJECT_ID,
    clientKey: process.env.REACT_APP_CLIENT_KEY,
    appId: process.env.REACT_APP_APP_ID,
    aaOptions: {
      simple: [{ chainId: ZetaChainTestnet.id, version: '1.0.0' }]
    }
});
From here, the custom ethers provider object can be constructed through AAWrapProvider, which will initiate a new provider through the constructed SmartAccount object. Requests sent through this provider (transaction execution, message signing, etc.) will be directed to an AA-enabled embedded wallet (through Particle Auth Core). Additionally, within AAWrapProvider, we can pass in SendTransactionMode.Gasless, which will automatically request a signature from the Particle Omnichain Paymaster upon transaction execution. For Testnets, this'll be automatically sponsored free of charge, although, for Mainnets, you'll need to recharge the Paymaster on the Particle dashboard.
const customProvider = new ethers.providers.Web3Provider(new AAWrapProvider(smartAccount, SendTransactionMode.Gasless), "any");
This demo application also retrieves and displays the user’s balance on-screen by pulling the smart account address with smartAccount and calling a standard balance retrieval function upon a state shift within userInfo. This isn't required to useParticle Auth Core, but was included here for demonstration.
// This is optional
const [balance, setBalance] = useState(null);

useEffect(() => {
    if (userInfo) {
      fetchBalance();
    }
}, [userInfo, smartAccount, customProvider]);

const fetchBalance = async () => {
    const address = await smartAccount.getAddress();
    const balanceResponse = await customProvider.getBalance(address);
    setBalance(ethers.utils.formatEther(balanceResponse));
};
Facilitating social logins with Particle Auth Core is as simple as calling connect. Although, within our corresponding handleLogin function, we'll be connecting to a specified social login provider (through authType / socialType) on the condition that userInfo is not populated, indicating that the user has not been logged in. This is shown in the snippet below.
const handleLogin = async (authType) => {
    if (!userInfo) {
      await connect({
          socialType: authType,
          chain: ZetaChainTestnet,
      });
    }
};
Finally, we're ready to execute the sample UserOperation covered earlier. To recap, this'll be a burn of 0.001 ZETA, and due to the former configuration of customProvider (with SendTransactionMode.Gasless), it'll be sponsored. The executeUserOp function in this example will be quite standard, including retrieval of the signer object with ethers (customProvider.getSigner), then the construction and execution of a small transaction object, following the same structure as any typical EOA transaction.
const executeUserOp = async () => {
    const signer = customProvider.getSigner();
    const tx = {
      to: "0x000000000000000000000000000000000000dEaD",
      value: ethers.utils.parseEther("0.001"),
    };
    const txResponse = await signer.sendTransaction(tx);
    const txReceipt = await txResponse.wait();
  };
At this point, you've initiated a social login, assigned the resulting wallet to a SimpleAccount implementation, then executed a gasless transaction. Thus, your App.tsx file should look something like this snippet:
import React, { useState, useEffect } from 'react';
import { useEthereum, useConnect, useAuthCore } from '@particle-network/auth-core-modal';
import { ZetaChainTestnet } from '@particle-network/chains';
import { AAWrapProvider, SmartAccount } from '@particle-network/aa';
import { ethers } from 'ethers';

const App = () => {
  const { provider } = useEthereum();
  const { connect, disconnect } = useConnect();
  const { userInfo } = useAuthCore();

  const smartAccount = new SmartAccount(provider, {
    projectId: process.env.REACT_APP_PROJECT_ID,
    clientKey: process.env.REACT_APP_CLIENT_KEY,
    appId: process.env.REACT_APP_APP_ID,
    aaOptions: {
      simple: [{ chainId: ZetaChainTestnet.id, version: '1.0.0' }]
    }
  });

  const customProvider = new ethers.providers.Web3Provider(new AAWrapProvider(smartAccount), "any");
  const [balance, setBalance] = useState(null);

  useEffect(() => {
    if (userInfo) {
      fetchBalance();
    }
  }, [userInfo, smartAccount, customProvider]);

  const fetchBalance = async () => {
    const address = await smartAccount.getAddress();
    const balanceResponse = await customProvider.getBalance(address);
    setBalance(ethers.utils.formatEther(balanceResponse));
  };

  const handleLogin = async (authType) => {
    if (!userInfo) {
      await connect({
          socialType: authType,
          chain: ZetaChainTestnet,
      });
    }
  };

  const executeUserOp = async () => {
    const signer = customProvider.getSigner();
    const tx = {
      to: "0x000000000000000000000000000000000000dEaD",
      value: ethers.utils.parseEther("0.001"),
    };
    const txResponse = await signer.sendTransaction(tx);
    const txReceipt = await txResponse.wait();
  };

  return (
    // Your JSX
  );
};

export default App;
As shown, leveraging Smart Wallet-as-a-Service natively on ZetaChain, hand-in-hand with Particle Network's in-house account abstraction infrastructure, can be achieved in just a few lines of code with minimal setup, supercharging user experience without friction.
To explore this demo yourself, head over to its deployment at https://particle-zetachain-demo.replit.app. Additionally, take a look at the Particle Network ZetaChain Demo repository for a replication of the example covered here. A video covering this example (although using Particle Auth rather than Particle Auth Core) is also available on Twitter.
Part 2: Account Abstraction Infrastructure
While often used directly with Smart Wallet-as-a-Service, Particle Network's account abstraction infrastructure can also be leveraged independently within any project, even if it isn't using Smart Wallet-as-a-Service. This is especially true of the Particle Bundler, AA SDK/RPC, and Omnichain Paymaster, all of which can be used to construct, sponsor, and send UserOperations for free.
Particle Bundler
The Particle Bundler is an open-source, TypeScript-based Bundler implementation made by Particle Network in 2023. This bundler has serviced over one million UserOperations across a variety of EVM chains, supporting high transaction volumes in short amounts of time due to its role in various AA-focused campaigns while maintaining a high degree of stability. In the case of ZetaChain, it has processed over 70,000 UserOperations in just a few months.
As mentioned, this Bundler is entirely open-source and thus free-to-use for all developers through https://bundler.particle.network (or natively through Particle's AA SDK), supporting every standard ERC-4337 Bundler method, such as eth_sendUserOperation, eth_estimateUserOperationGas, eth_getUserOperationByHash, etc. For a complete list of supported methods, the parameters they take, and some query examples, head over to the Particle Bundler RPC reference.
Additionally, take a look at the open-source repository for the Particle Bundler, found at https://github.com/Particle-Network/particle-bundler-server.
Particle Omnichain Paymaster
In addition to an in-house Bundler, Particle Network also has its own verifying Paymaster, capable of sponsoring gas on any supported chain, using a stablecoin deposited on a single host chain (Ethereum or BNB chain mainnet). Thus, to use the Particle Omnichain Paymaster, a developer deposits a specific amount of USDT on one of the two aforementioned chains. These funds will be automatically converted to the native token of the chain requesting a sponsorship (ZETA on ZetaChain in this example), meaning you only need to manage one balance, rather than an independent pool of funds for each chain you support.
The Particle Omnichain Paymaster also has support for webhook-based sponsorship conditions, allowing sponsorship requests to be routed through hooks that determine whether or not the UserOperation in question meets specific criteria to be sponsored. This criteria can be anything, either on-chain or off-chain, and will essentially return a true or false value based upon whether or not a given UserOperation should be sponsored.
Using the Particle Omnichain Paymaster can be done either through the Particle AA SDK, in which the Paymaster is set by default or, alternatively, you can use its associated RPC, https://paymaster.particle.network. This RPC supports two methods, pm_paymasterBalance and pm_sponsorUserOperation.
Learn more about working with Particle Network's Paymaster.
Particle AA SDK
Finally, the Particle AA SDK can also be used independently with any other wallet provider (through a given EIP-1193 provider object passed into SmartAccount). This can facilitate the same simple, 5-line smart account setup and initialization process, with interaction happening either directly with SmartAccount or through a custom Ethers/Web3.js/viem object.
By default, Particle's AA SDK uses the Particle Bundler and the Particle Omnichain Paymaster, although, through a fundamental focus on modularity, you can also either plug in a Biconomy Paymaster (through the SmartAccount configuration) or use any other Bundler/Paymaster pair independently, just leaving the account management and UserOperation construction to @particle-network/aa, handling sponsorship and execution externally.
To learn more about using Particle Network's AA SDK, head over to the AA quickstart guide.
Conclusion
Leveraging Particle Network's Smart Wallet-as-a-Service and associated AA infrastructure with ZetaChain for AA-enabled Omnichain dApps is the perfect match for consumer-ready, seamless experiences. To learn more about ZetaChain and building Omnichain dApps, head over to their main website, and their documentation. Additionally, take a look at the deployed demo covering the example application made throughout this document.
A video walking through the process of leveraging Particle Network's Smart Wallet-as-a-Service on ZetaChain is available.
Updated 3 months ago